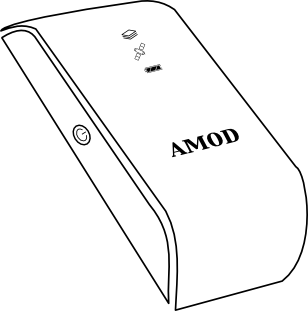
The AMOD AGL3080 is a sleek, affordable GPS data logger. Built around the renowned SiRF III chipset, it makes an excellent carry along companion while out and about with your favorite camera.
The AMOD AGL3080 is a sleek, affordable GPS data logger.
Built around the renowned SiRF III chipset, it makes an excellent carry along companion while out and about with your favorite camera.
![]()
When combined with Geotagalog's sophisticated automatic geotagging technology,
the tracklogs recorded by a GPS logger can make adding place data to your photos incredibly straightforward.
This guide and illustrations are © 2009 Calf Trail Software, LLC. All rights reserved. Do not reprint without permission.
AGL3080 and AMOD are trademarks of AMOD Technologies Co., Ltd.
IMPORTANT NOTE: This is an UNOFFICIAL guide produced independently by Calf Trail Software, LLC. You MUST consult the manual provided with your device to ensure safe and proper operation of your device. The information presented here may be incorrect, inaccurate and/or incomplete. USE AT YOUR OWN RISK.
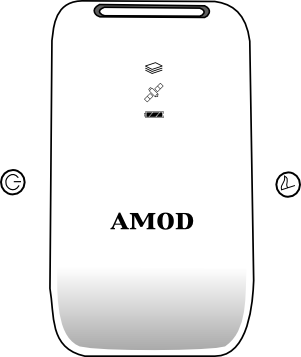
The illustration above shows the relative positions of the s and
indicator lights referred to in the instructions that follow.
Indicators are described as solid (on, i.e. constantly lit),
blinking (intermittently lit) or off (not lit).
The Satellite indicator shows logging status. When it is off, the logger is off. When it is solid, the logger is in the process of acquiring enough satellites before it is able to determine its position. When it is blinking, the device is logging location information.
To begin GPS logging, hold the until all three indicators turn solid (it will take about a second). After the is released, the Satellite indicator will remain displayed. When it begins blinking, logging is in progress. When the device is searching for enough position information, the Satellite indicator will be solid and no logging is in progress.
To turn the device off, hold the until all three indicators are displayed (this will take about three seconds). The Satellite indicator will be off.
If the device is moved a great distance from where it was last used, it may search for an incorrect set of satellites. This will cause logging to be delayed longer than usual, or the device may fail to find its position. To start a new search for satellites, hold the until the Storage indicator begins blinking (after about four seconds).
NOTE: Some versions of the AMOD AGL3080 shipped with a firmware setting known as "Static Navigation" turned On. If Static Navigation is On, the GPS will not update its location whenever it thinks you are not moving. This can be useful for automobile satnav devices, but for geotagging it is not recommended, especially if you are moving slowly on foot. Immediately after the device is turned on, the Storage indicator will blink to indicate the firmware setting. If it flashes 3 times, Static Navigation is Off and actual position fixes will be recorded. If it flashes only 2 times, Static Navigation (SN) is On and motion-filtered position data will be recorded. In this case, you may want to update the firmware to a version with SN Off.
A position can be specially noted using the . The Storage indicator will light when the is pressed, and a waypoint will be recorded if the device is logging location information. (If the Satellite indicator is solid instead of blinking, the device is still searching for position information and a waypoint may not be recorded.)
NOTE: Avoid unintentionally holding the down when noting waypoints. When the is held for too long, the satellite search will start over and logging will be interrupted.
The Battery indicator will start blinking as the batteries go flat. The more often it blinks, the lower the charge is becoming. When the Battery indicator glows solid, the device does not have enough power to continue logging; turn the device off and replace the batteries. (You may, however, still connect the unit to your computer without batteries to access tracklogs.)
As with any electronic device, we recommend that you invest in rechargeable batteries and a charger. With a quality recharging station, modern NiMH batteries (especially low self-discharge or "pre-charged" models), offer very good performance. Disposable alkalines are rarely cost effective.
NOTE: The AGL3080 will lose data if its power is cut off while it is still operating. Until this is fixed, turn the device off soon after the Battery indicator turns solid (do not wait until the batteries go completely dead). Never replace the batteries while the device is on.
The Storage indicator will glow solid when there is no more memory available to store log data. Data must be moved off of the device, or its storage must be cleared, before logging can continue.
You can connect the logger to a computer with a standard USB Mini-B cable. The connector socket is located under a cover near the strap handle at the top of the device. No batteries are necessary to connect the logger in this way.
On OS X, The AGL3080 should show up as an attached disk named GPS TRACKER soon after connection. Like a thumbdrive or memory card, files and folders may be copied to the device if desired, though they will reduce the amount of space available for log storage.
The location log files are stored in a folder named GPSFILES. A new file is created after the device is powered on when logging begins, and is named according to the date and time in GMT of its creation. Each file contains NMEA 0183 data that can be used by many GPS-aware applications, including Geotagalog.
NOTE: If the GPSFILES folder shown on the GPS TRACKER disk does not contain the expected files, this visible folder may need to be renamed before the correct GPSFILES folder appears. For some reason, the AGL3080 may store files to a second, identically-named folder, which may not show up when connected to a computer. Renaming or removing the visible folder will allow the alternate folder to display. This corrective action remains effective until the device needs to create the folder again, at which point the duplicate folder may need to be moved aside again.
Two features of the AGL3080 may be accessed in Setup mode: configurable logging amount and storage reset.
To enter setup mode, make sure the device is off. Then hold both the and s simultaneously until all three indicators stop blinking and stay solid (this will take about 5 seconds). When the buttons are released, the device will show the current logging mode.
Press (do not hold, see “Storage reset” below!) the to change the logging mode. The indicators will change as follows:
| Indicator | What is stored |
|---|---|
| Storage solid | Every second: Coordinates, altitude, speed, course, accuracy, satellites used (GGA/GSA/RMC/VTG sentences) Every 5 seconds: Satellites in view (GSV sentences) Allows approximately 72 hours of detailed logging. |
| Storage blinking |
Every second: Coordinates, speed and course (RMC sentence) Allows approximately 288 hours of basic logging. |
| Satellite solid |
Every 5 seconds: Coordinates, altitude, speed, course, accuracy, satellites used, satellites in view (GGA/GSA/RMC/VTG/GSV sentences) Allows approximately 360 hours of detailed logging. |
| Satellite blinking |
Every 5 seconds: Coordinates, speed and course (RMC sentence) Allows approximately 1440 hours of basic logging. |
| Battery solid |
Every 10 seconds: Coordinates, altitude, speed, course, accuracy, satellites used, satellites in view (GGA/GSA/RMC/VTG/GSV sentences) Allows approximately 720 hours of detailed logging. |
| Battery blinking |
Every 10 seconds: Coordinates, speed and course (RMC sentence) Allows approximately 2880 hours of basic logging. |
While in Setup mode, hold the until all three indicators begin blinking in turn. All files on the AGL3080 will be deleted when the is released. If you change your mind, press the while still holding the and the logging amount will be changed instead of the storage being reset.
NOTE: This will erase all recorded tracklogs and any other data you have stored on the device. It is not necessary to reset the storage if you move or delete files off of the tracker while it is connected to your computer.
To exit setup mode, simply hold the to power off as usual. The device will also power itself off after about a minute of inactivity in setup mode.